Mein Versuchsaufbau besteht aus:
- 1 x Arduino Uno-Nachbau von AZ-Delivery
- 1 x Joystick aus Freenove Starterpaket
- Kabel
- 3 x LED (rot, gelb, grün)
- 3 x 220 Ohm-Widerstände
Verwendete Software:
- Arduino IDE 1.8.16
- Quellcode aus dem Freenove Tutorial mit eigener Erweiterung
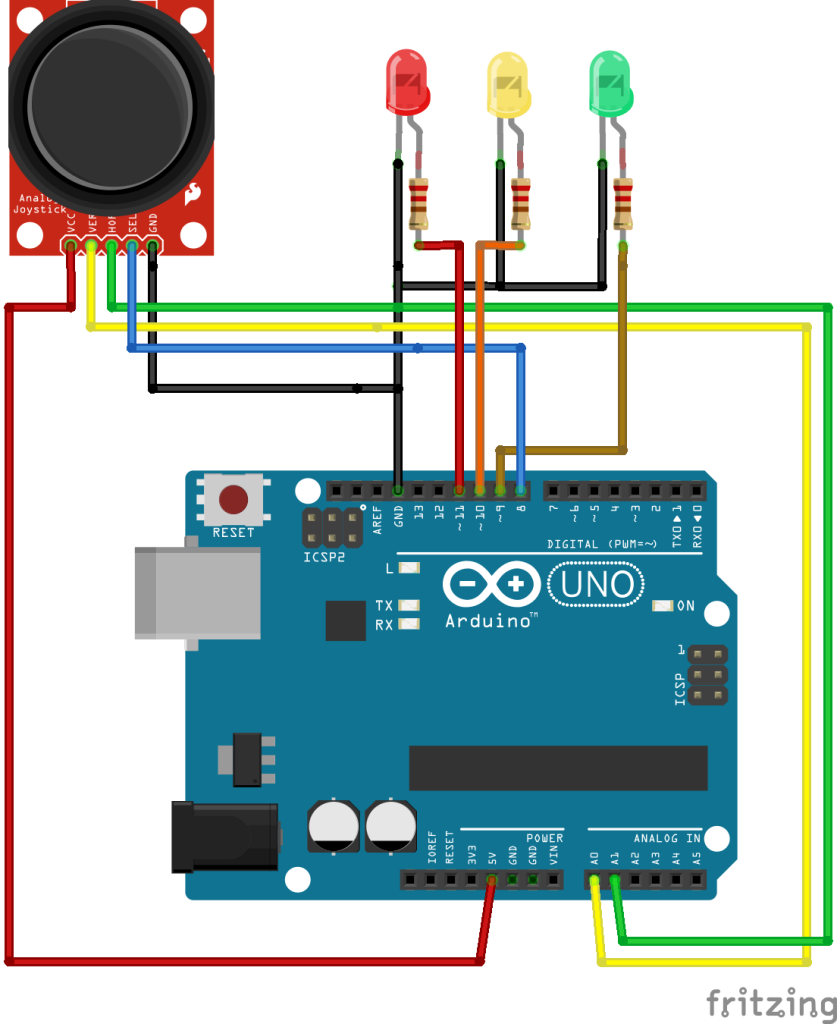
Anschlussplan:
Folgender Quellcode wurde verwendet:
//Joystick
int xAxisPin = 0; // define X pin of Joystick
int yAxisPin = 1; // define Y pin of Joystick
int zAxisPin = 8; // define Z pin of Joystick
float xVal, yVal, zVal; // define 3 variables to store the values of 3 direction

//Display
int xLEDPin = 9;
int yLEDPin = 10;
int zLEDPin = 11;
float xLEDVal, yLEDVal;


void setup()
{
  pinMode(zAxisPin, INPUT_PULLUP); // initialize the port to pull-up input
  Serial.begin(115200); // initialize the serial port with baud rate 9600
  Serial.println("UNO is ready!"); // print the string "UNO is ready!"
}

void loop()
{ // read analog value in XY axis
  xVal = analogRead(xAxisPin);
  xLEDVal = xVal*255/1024;
  analogWrite(xLEDPin, xLEDVal);
  Serial.println(xLEDVal);
  yVal = analogRead(yAxisPin); // read digital value of switch in Z axis
  yLEDVal = yVal*255/1024;
  analogWrite(yLEDPin, yLEDVal);
  zVal = digitalRead(zAxisPin); //print the data read above
  if(zVal == 1.00)
  {
      analogWrite(zLEDPin, 255);
  }
  else
  {
    analogWrite(zLEDPin, LOW);
  }
  Serial.print("X : ");
  Serial.print(xVal);
  Serial.print(" \t Y : ");
  Serial.print(yVal);
  Serial.print(" \t Z : ");
  Serial.println(zVal);
  delay(200);
}
Fazit:
Je nach Achse wird die LED heller oder dunkler. (grün => x-Achse, gelb => y-Achse)
Bei Druck auf den Joystick wird die rote LED ausgeschaltet. (z-Achse)